NFTs continue to fascinate the public. Billions have been spent by people all over the world trying to own one (or several) and every new day comes with yet another use case for NFT tokens. Suffice it to say that there has never been a better time to learn how to create a minting dapp to help you create as many non-fungible tokens for your crypto wallet and otherwise as you like.
The idea of minting your own tokens may seem daunting at this point, especially if you are still new to the Web3 space or NFT development in general, but you have nothing to fear. With the right tools and guidance, you can easily learn how to create your own NFTs.
And that’s where Moralis comes in. Their vision is to empower all the daring souls who are building the world of tomorrow via web3, and because of that, they have provided an easy-to-understand walkthrough on how to go about creating your own minting dapp through which you can create your own NFT tokens.
What Is a Minting Dapp?
First things first, if you want to learn how to create your own tokens, you need to learn what a minting dapp is.
Let’s separate the term into its constituent parts:
Dapp stands for Decentralized Application and describes any application that runs on a blockchain or a peer-to-peer network instead of a single computer. These are apps that are not hosted on a central server, and control is shared among members of the network.
Dapps are usually, but not always, built on the Ethereum blockchain, which is the first blockchain that used smart contracts which serve as the backbone of these decentralized applications.
Minting, on the other hand, traditionally refers to the act of making coins. However, in Web3 lingo it has been adopted to refer to the process of making tokens—coins that are non-native to a particular blockchain.
Therefore, a minting dapp is a decentralized application that mints tokens—both fungible and non-fungible.
What Are NFTs
Another foundational concept is that of NFTs. Before you mint your own NFTs, you must know what they are in the first place.
NFTs are simply unique digital assets that exist on a blockchain and cannot be replicated. Each NFT has a unique identification code and metadata that differentiates it from any other—even one that looks the same.
Unlike fungible digital assets like cryptocurrency and other types of tokens which are all the same, NFTs cannot be exchanged at equivalency. Since no two NFTs are the same, they cannot serve as a medium of exchange.
This uniqueness of NFTs is the main reason they make such great collectibles. Once you own an NFT, you can be sure that you own the only one in the entire world.
It would be a disservice to reduce these tokens to merely digital art though. There are many use cases that crop up every day including security, enforcement of transparency, and certification, among others.
What Is NFT Minting?
Now that we know what minting dapps are and also what NFTs are, we can come full circle by taking a look at what NFT minting is before forging ahead to learn how to create a minting dapp with tools provided by Moralis.
We’ve already discussed about how the term “minting” has been adopted by actors in the web3 space to describe the process of creating tokens on a blockchain. During this process, a relevant smart contract is deployed to create tokens on a blockchain. Once the details of the NFTs are stored on a blockchain, they are known as metadata.
Minting can be done on any programmable blockchain like Flow, Avalanche, Tezos, Solana, Fantom, Polygon, BSC, and others. But the most common blockchain used is Ethereum.
This is the reason why you will hear more about Ethereum’s NFT standards like ERC-20, ERC-1155, and ERC-721 more than any other.
If you’re going to create your own NFT minting dapp, you need to understand the basics of NFT standards.
Simply put, the term “standards” refers to the underlying principles that decide how a piece of technology functions. In the case of NFT standards, therefore, they refer to how to build non-fungible tokens on a specific blockchain protocol. Ethereum standards like ERC-721 and others are simply rules to follow when minting on the Ethereum blockchain.
Step-By-Step Example Case on How to Create a Minting Dapp
Now that all the basics are covered, we can go ahead to the nitty-gritty of creating a minting dapp for yourself using tools provided by Moralis.
The first thing you need to do is obtain your created Moralis server URL and application ID. This is an important first step you need to get started with this guide. Here’s how to go about it:
- Create Your Moralis Account
It’s time to create one if you haven’t yet. You can create an account by following this link to the signup page. You’ll need to provide your email address and create a password, then click on the confirmation link in the email that will be sent to your email inbox.
Those who already have Moralis accounts simply have to log in
- Create a Brand New Server for Your Project
Once you log into your Moralis admin area, you can set about creating a new server. Click on the button designated “+ Create a new dapp” found in the bottom left of the screen.
A pop-up will show up saying “Select Environment”. You can then choose any of the server types you find in the dropdown menu. There are three options, but since this is a test case, go with the “Testnet Server” option.
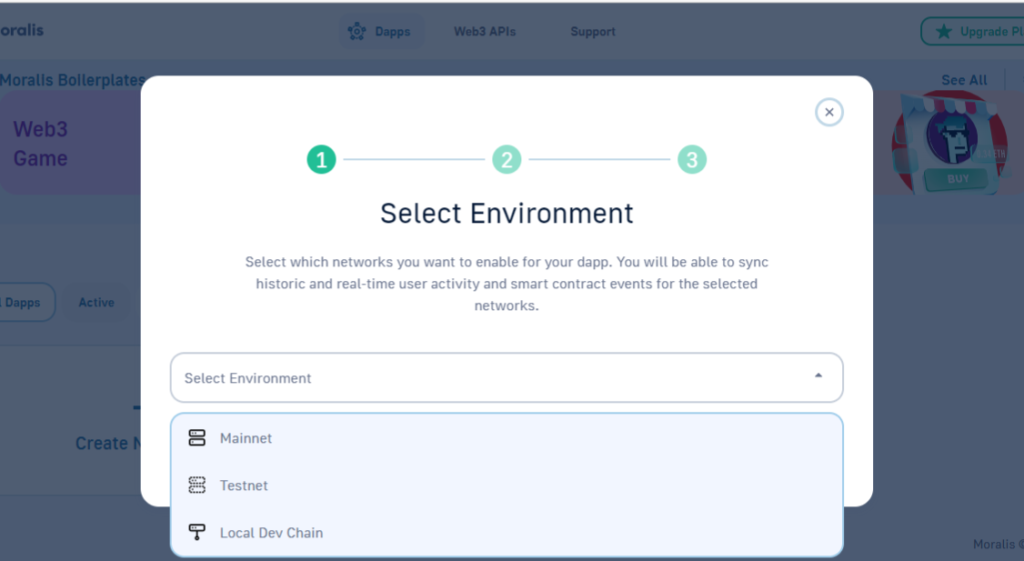
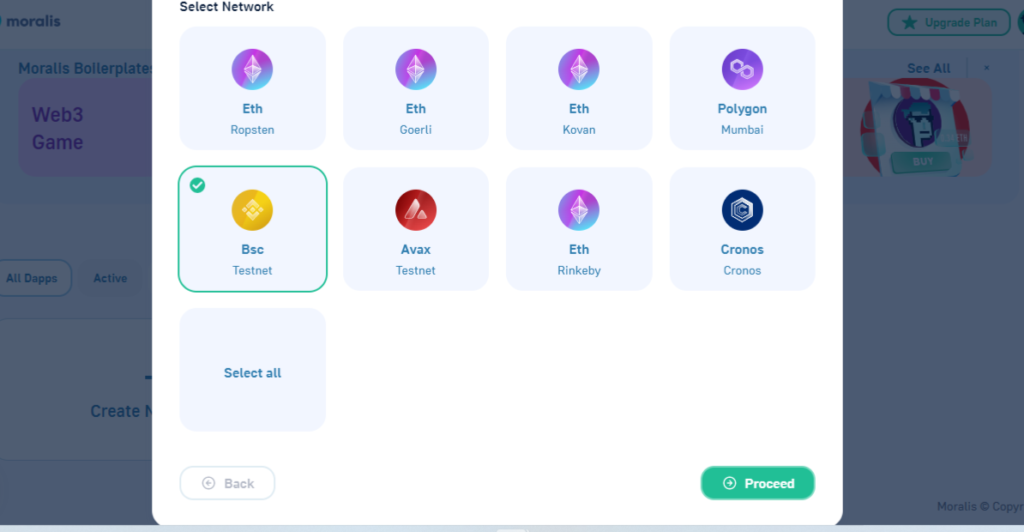
Once you click on your choice for servers, more options will show up on the menu, requiring you to choose a network. Choose any of the Testnet options and click “Proceed” at the bottom right of the menu.
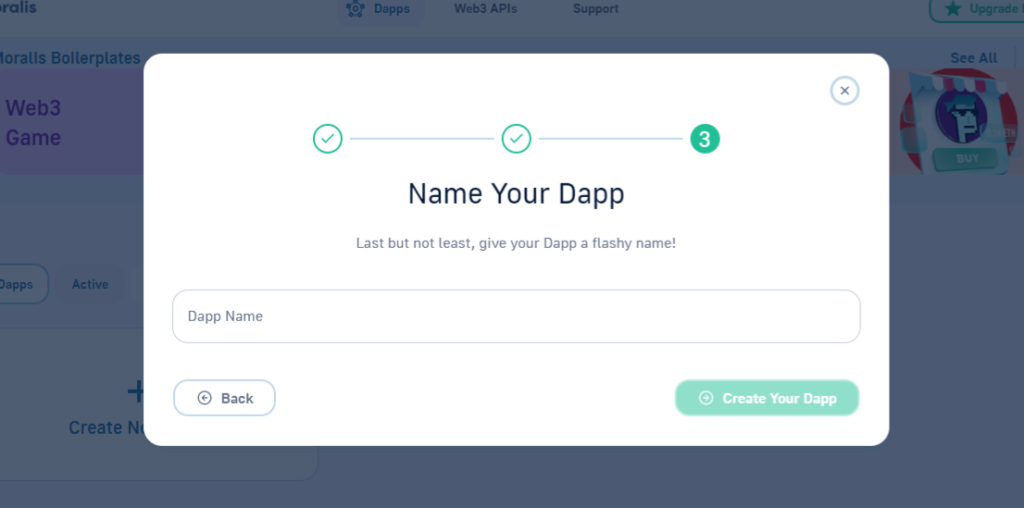
You will be led to the next 2 steps where you can choose the “Region” and a “Dapp Name” for your dapp which can be anything so you can be creative.
- Access Server Details
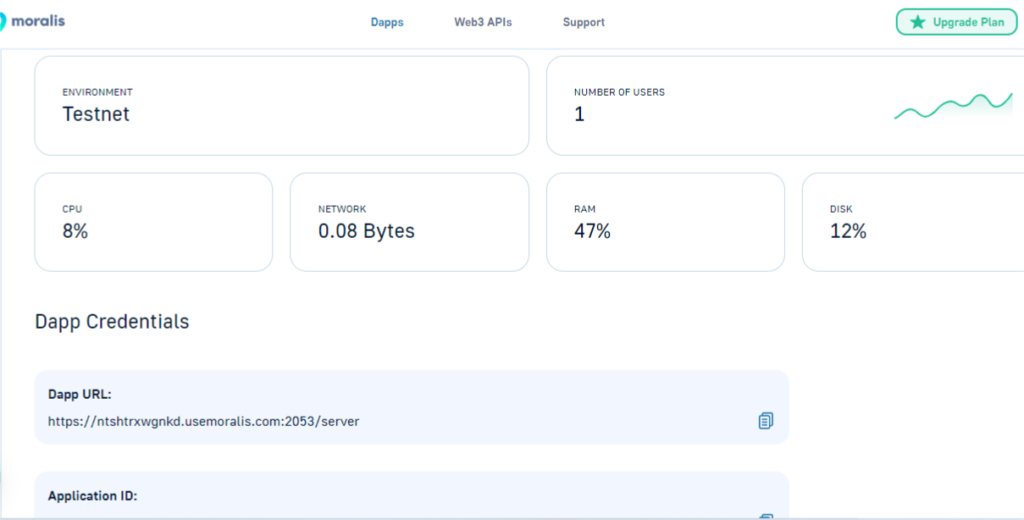
Once the button denoting your server appears on the screen, click on “settings” to reveal details about your new server. This will lead to a new page where you can get relevant information about your server like the “Dapp URL” and “Application ID”.
- Use the Server Information to Initialize Moralis
Copy and paste your Dapp URL and application ID into your “.js” to fire up Moralis at the backend and obtain the required functionality (More on this shortly).
Creating Your Minting Dapp—Handling the Code
Before proceeding to the coding that would help you create your own minting dapp, let’s take a look at what your minting page will look like when you’re done.

As you can see from the screenshot above, the end result is simple and easy to navigate. It’s a highly functional page that would allow users to log in with their usernames and an email address, after which they will then authenticate with MetaMask.
Once users sign in they can name their NFT, add a description, choose the file they want to modify, before uploading the file to mint a brand new NFT.
Once this short process is done, users will see a confirmation message that their NFT was successfully minted.
Let’s proceed to the coding part.
There are many approaches you can take to create the end-product shown above. For this particular test case, however, we are going to use the Python flask app to initiate the associated code. Since the main parts of our code are the “logic.js” and the “index.html” files, we will focus on those two files a lot in this section.
Open the Flask App
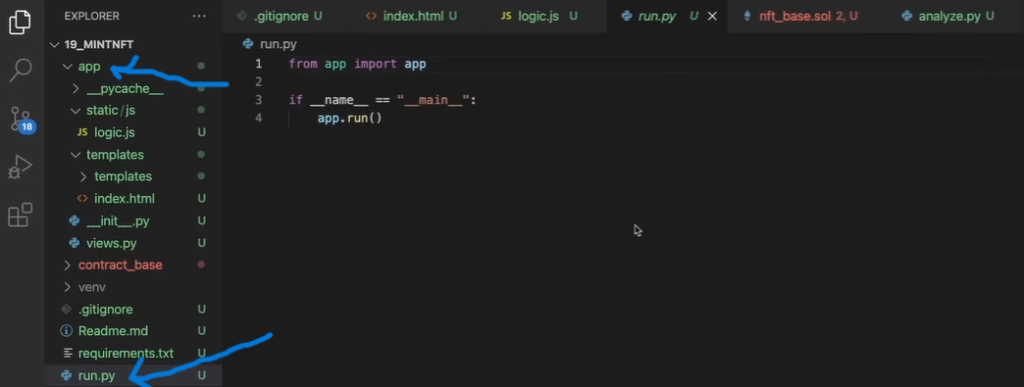
Once you open the flask app, you’ll find an easy-to-navigate interface with the “run.py” function at the bottom of the list found on the left side of the screen. The role of this function is to run the entire app and trigger all the other functions that are found under the “app” directory to be found at the top of this same list.
Build Your “Index HTML”
The real magic of your minting app lies with your “index html”. This file contains all the elements you need for the dapp. These are outlined below, but you can access them for yourself here:
1 {% extends “templates/base_template.html” %}
2 {% block title %}MINT YOUR FANCY{% endblock %}
3 {% block head%}
4 {% endblock %}
5 {% block main %}
6
7 <div class=”container”>
8 <div class=”row”>
9 <div class=”col”>
10 <h1>Mint NFT</h1>
11 <hr>
12 <div class=”mb-3″>
13 <div class=”form-group”>
14 <div class=”input-group mb-3″>
15 <input id=”username” type=”text” class=”form-control” placeholder=”Username” aria-label=”Username” aria-describedby=”basic-addon1″>
16 </div>
17 <div class=”input-group mb-3″>
18 <input id=”useremail” type=”text” class=”form-control” placeholder=”Email” aria-label=”Email” aria-describedby=”basic-addon1″>
19 </div>
20 </div>
21 <div>
22 <button class=”btn btn-primary” id=”submit” onclick=”login();”>Connect MetaMask</button>
23 </div>
24 </div>
25 <hr>
26 <div class=”mb-3″>
27 <div class=”form-group”>
28 <div class=”input-group mb-3″>
29 <input disabled = “true” id=”name” type=”text” class=”form-control” placeholder=”NFT Name” aria-label=”URL” aria-describedby=”basic-addon1″>
30 </div>
31 <div class=”input-group mb-3″>
32 <input disabled = “true” id=”description” type=”text” class=”form-control” placeholder=”Description” aria-label=”URL” aria-describedby=”basic-addon1″>
33 </div>
34 <div class=”input-group mb-3″>
35 <input type=”file” disabled = “true” id=”file”>
36 </div>
37 </div>
38 <div>
39 <button disabled = “true” class=”btn btn-primary” id=”upload” onclick=”upload();”>Upload and Mint</button>
40 </div>
41 <hr>
42 <div class=”input-group mb-3″ id=”resultSpace”>
43 </div>
44 </div>
45 </div>
46 </div>
47 </div>
48
49 {% endblock %}
50 {% block script %}
51 <script src=”https://cdn.jsdelivr.net/npm/web3@latest/dist/web3.min.js”></script>
52 <script src=”https://unpkg.com/moralis/dist/moralis.js”></script>
53 <script src=”{{ url_for(‘static’, filename=’js/logic.js’) }}”></script>
54 {% endblock %}
If you look through the code you can see all the parts of the code that correspond to the fields of your minting dapp like the interaction buttons that you need for the login with metamask. You can also see the parts that correspond to the fields of the minter itself where we can submit the “description” and the “NFT Name”.
On Line 35 you can find what corresponds to one of the most critical elements you need when minting NFTs: the “input” file element. This is the line of code that enables users to upload a file. While on Line 39 you get the code that initiates the minting process by clicking the button that activates the logic elements.
Build Your “logic.js” file
The “logic.js” is the file that contains all the information pertaining to the NFT you want to mint. You can liken it to a deed of property for a piece of real estate you own, which you can find at your local council. Such a deed would contain pertinent information that would confirm ownership and outline a description of the property—what we call the metadata.
When you create an NFT, a huge part of the process is linking the minted token to its metadata. In Web3, this information is stored in a decentralized manner with the help of the Interplanetary File System (IPFS).
Normally, you could do the storing yourself by dealing with IPFS directly, but that would require a bit of heavy lifting in order to create your own NFTs. Fortunately, with Moralis, you have functions that make things easier.
We’ll point them out in the logic code below which you can access for yourself here:
1 Moralis.initialize(“”); // Application id from moralis.io
2 Moralis.serverURL = “”; //Server url from moralis.io
3 const nft_contract_address = “” //NFT Minting Contract Use This One “Batteries 4 Included”, code of this contract is in the github repository under contract_base for your reference.
5 /*
6 Available deployed contracts
7 Ethereum Rinkeby 0x0Fb6EF3505b9c52Ed39595433a21aF9B5FCc4431
8 Polygon Mumbai 0x351bbee7C6E9268A1BF741B098448477E08A0a53
9 BSC Testnet 0x88624DD1c725C6A95E223170fa99ddB22E1C6DDD
10 */
11
12 const web3 = new Web3(window.ethereum);
13
14 //frontend logic
15
16 async function login(){
17 document.getElementById(‘submit’).setAttribute(“disabled”, null);
18 document.getElementById(‘username’).setAttribute(“disabled”, null);
19 document.getElementById(‘useremail’).setAttribute(“disabled”, null);
20 Moralis.Web3.authenticate().then(function (user) {
21 user.set(“name”,document.getElementById(‘username’).value);
22 user.set(“email”,document.getElementById(‘useremail’).value);
23 user.save();
24 document.getElementById(“upload”).removeAttribute(“disabled”);
25 document.getElementById(“file”).removeAttribute(“disabled”);
26 document.getElementById(“name”).removeAttribute(“disabled”);
27 document.getElementById(“description”).removeAttribute(“disabled”);
28 })
29 }
30
31 async function upload(){
32 const fileInput = document.getElementById(“file”);
33 const data = fileInput.files[0];
34 const imageFile = new Moralis.File(data.name, data);
35 document.getElementById(‘upload’).setAttribute(“disabled”, null);
36 document.getElementById(‘file’).setAttribute(“disabled”, null);
37 document.getElementById(‘name’).setAttribute(“disabled”, null);
38 document.getElementById(‘description’).setAttribute(“disabled”, null);
39 await imageFile.saveIPFS();
40 const imageURI = imageFile.ipfs();
41 const metadata = {
42 “name”:document.getElementById(“name”).value,
43 “description”:document.getElementById(“description”).value,
44 “image”:imageURI
45 }
46 const metadataFile = new Moralis.File(“metadata.json”, {base64:btoa(JSON.stringify(metadata))});
47 await metadataFile.saveIPFS();
48 const metadataURI = metadataFile.ipfs();
49 const txt = await mintToken(metadataURI).then(notify)
50 }
51
52 async function mintToken(_uri){
53 const encodedFunction = web3.eth.abi.encodeFunctionCall({
54 name: “mintToken”,
55 type: “function”,
56 inputs: [{
57 type: ‘string’,
58 name: ‘tokenURI’
59 }]
60 }, [_uri]);
61
62 const transactionParameters = {
63 to: nft_contract_address,
64 from: ethereum.selectedAddress,
65 data: encodedFunction
66 };
67 const txt = await ethereum.request({
68 method: ‘eth_sendTransaction’,
69 params: [transactionParameters]
70 });
71 return txt
72 }
73
74 async function notify(_txt){
75 document.getElementById(“resultSpace”).innerHTML =
76 ` <input disabled = “true” id=”result” type=”text” class=”form-control” placeholder=”Description” aria-label=”URL” aria-describedby=”basic-addon1″ value=”Your NFT was minted in transaction ${_txt}”>`;
77 }
In lines 1 and 2, copy and paste your server information described above (Application ID and Server URL respectively). This is crucial for starting the code once you run it.
From line 16 you can see the Moralis function that captures files in an array. Lower down on line 33, you can see the emphasis on “File[0]” because we are interested in the first element of the array (The file you uploaded to mint as an NFT).
Once your HTML file has been captured and transformed into a Moralis file object (line 34), you can store it in a centralized location like Moralis or a decentralized location like IPFS (line 39).
For this test case, we’re going to choose IPFS, as shown above. After the file is saved in IPFS, Moralis provides two other objects, namely the hash of the file from IPFS, which is the way IPFS ensures your NFT is unique on their network, and the URL.
The rest of the code captures the metadata of the file and transforms it to a Moralis file object before storing it on IPFS as well. Moralis will then give you the IPFS URL after which the code will create a mint token by way of the mint token function starting on line 49.
The smart contract needed to run with your mint token function is not included in the code above, but you can access one by checking in Github and looking for “contract” within the code.
How to Create A Minting Dapp-Summary
At this point, we’ve seen how to create your own NFT minting dapp, and looked through all the 70 or so lines of code that go into making it happen. We’ve also seen how tools created by Moralis could save you time and effort in your quest to mint your own NFTs. Don’t let anyone or anything hold you back from putting this knowledge into practice right away.

